
Stop the SATA Shuffle: How to Migrate Windows VMs to Proxmox VE Without Boot Failures
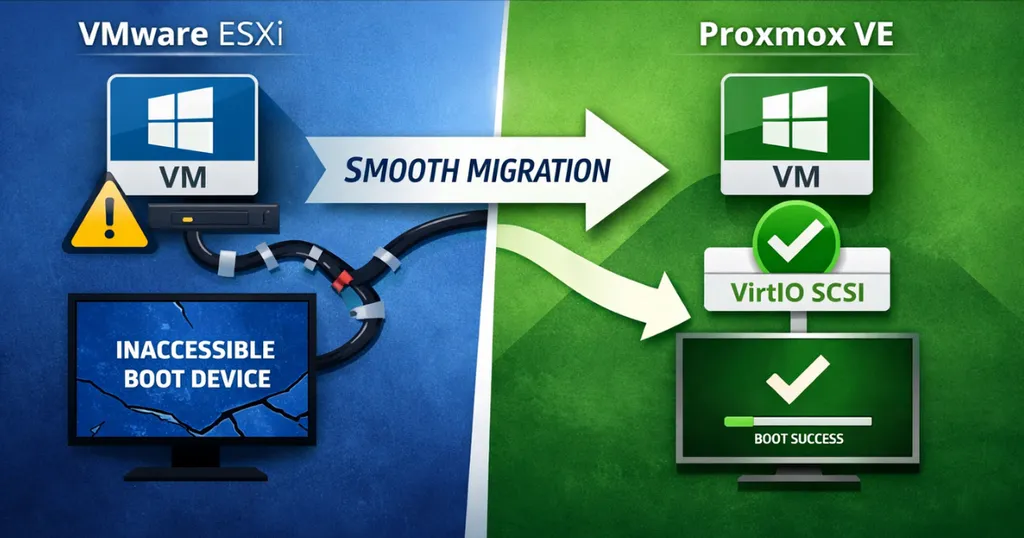
If you move a Windows boot disk from ESXi to Proxmox VE without prep work, the VM will crash with an "Inaccessible Boot Device" error before you even reach the login screen. This happens because Windows doesn't load VirtIO storage drivers by default. While you can hack around this by toggling hardware settings and rebooting multiple times, there is a better way. This guide shows you how to prime the storage stack on the source system so the VM boots on Proxmox the first time, every time. We’ll also cover how to force-remove VMware Tools when the standard uninstaller refuses to run on a new hypervisor.
1. The Migration Workflow
Moving a VM is about more than just copying a virtual disk. If Windows isn’t prepared for a new storage controller, it simply won’t boot. To avoid that, you need a workflow that handles the hardware shift before the VM ever leaves VMware.
The process follows this logic:
- Take a full snapshot or backup. If the driver injection fails, you’ll want an immediate way back.
- Install the VirtIO drivers and the guest agent while the VM is still on its original host.
- Run the preparation script to force the VirtIO storage driver into the boot-start phase.
- Move the disk data and configuration to Proxmox.
- Boot up and purge the leftover VMware Tools using a cleanup script.
- Re-map the static IP to the new VirtIO-Net interface.
Why the Storage Controller Matters
Proxmox performs best with the VirtIO SCSI or VirtIO SCSI single controller. The "single" version is the preferred choice for modern setups because it gives each disk a dedicated controller. You need this if you want to use IOThreads for better performance.
The problem is that Windows treats a change in the boot controller as a critical failure if the driver isn't already active. If you just swap an LSI Logic or VMware Paravirtual controller for VirtIO SCSI, the kernel won't find the boot partition. You'll be stuck at a Blue Screen of Death (BSOD).
Moving Beyond the "SATA-Shuffle"
Most online guides suggest a manual workaround: attach the boot disk as a generic SATA device to get the VM to boot, install the drivers, attach a dummy SCSI disk to trigger the driver load, and then finally switch the boot disk to SCSI.
It works, but it's a clunky, multi-reboot process that doesn't scale. Fine for one test VM. Painful for twenty production systems.
A better approach is to make the viostor driver "boot-aware" before you migrate. By injecting the driver into the Windows Driver Store and flagging it to load during initialization, you eliminate the hardware-toggling loop entirely. Now the migration is predictable. And if you’re moving dozens of machines, that matters.
2. Solution: VirtIO Driver Preparation
Before touching anything, back up the virtual machine. It’s a standard precaution, but if the driver injection goes sideways, you’ll need that rollback point.
You also need the drivers. The Proxmox Wiki is the best place to check for stable versus latest releases and to see if there are any specific version bugs you should avoid: https://pve.proxmox.com/wiki/Windows_VirtIO_Drivers .
This isn’t just flipping a Start=0 registry value and hoping Windows cooperates. The load-virtio-scsi-on-boot script works by creating a virtual device with a matching PCI-ID. This trick forces Windows to install the driver and, more importantly, flags it as a boot-critical requirement.
There are three ways to handle this.
Successful script execution: The storage driver is now flagged to load at boot.
Method 1: Direct Driver Targeting
This is the "just the basics" approach. Use this if you only care about the storage stack and don't want to install the full VirtIO suite yet. You point the script directly to the .inf file that matches your Windows version.
Example Command:
powershell.exe -ExecutionPolicy Bypass -File .\load-virtio-scsi-on-boot.ps1 -DriverPath "D:\vioscsi\2k25\amd64\vioscsi.inf"
Method 2: The Full Suite Installer
This is a more thorough approach. Run the official VirtIO or Guest Agent installer on the source system first. Once the drivers are local, you run the script without any paths, and it handles the rest.
Example Workflow:
- Run the virtio-win-gt-x64.msi or virtio-win-guest-tools.exe installer.
- Run the script:
powershell.exe -ExecutionPolicy Bypass -File .\load-virtio-scsi-on-boot.ps1
Method 3: Using WinGet
If you prefer the command line and have at least Windows 10 (1809), winget is the fastest way to get the drivers onto the system. It’s also the easiest way to pin a specific version if the latest release has known issues.
Example Workflow:
- Install the drivers. Omitting the version pulls the latest release, but you can target a specific one if needed and available (the currently best one, 0.1.271, unfortunately isn’t):
winget install RedHat.VirtIO
- Run the script to finalize the boot configuration:
powershell.exe -ExecutionPolicy Bypass -File .\load-virtio-scsi-on-boot.ps1
Why go the integrated route?
Using Method 2 or 3 is usually the better choice for production systems. That way, when the VM boots in Proxmox, you’re not just getting disk access. The network, display, and balloon drivers are already in place. The script automatically finds the local drivers and tags them for boot-start.
The Networking Gotcha: Windows will see the new VirtIO-Net adapter as a completely different device. It won't inherit your static IP, DNS, or Gateway settings from the old VMware NIC. You’ll have to re-configure these after the first boot. You might also need to rebind any services that depend on a specific interface.
Automation Tip: If the QEMU Guest Agent is installed before you migrate, you don't have to rely on the Proxmox console. You can use qm guest exec or the Proxmox API to push network configuration commands remotely once the VM is up.
3. Migration and Hardware Configuration
Once the drivers are ready, you can finally move the VM. Proxmox gives you a few different ways to do this, ranging from fully automated wizards to manual command-line imports. Which one you choose usually comes down to how much "hands-on" time you have and which management interface you prefer.
Migration Pathways
You can kick off most of these methods through the WebGUI, the CLI, or the REST API.
- ESXi Importer: This is the native way to do it. You’ll find it in the WebGUI under the storage section. It pulls the VM directly from your ESXi host and handles the disk conversion on the fly.
- The Catch: It does a full disk clone. If your source storage is already struggling or your network is saturated, this will put a heavy strain on the environment. Make sure your hardware can handle the extra I/O before starting a batch of imports.
- OVA/OVF Import: If you can't connect Proxmox directly to your ESXi host, export the VM as an OVF/OVA. You can then use the qm importovf command or the Import OVF tool in the WebGUI to bring it in.
- Disk Import: This is the manual route. You move the raw disk files (VMDK, QCOW2, etc.) to the Proxmox host and attach them to a "shell" VM you've already created. Use qm disk import for this, or the Import Disk option in the VM’s hardware tab.
If you did the prep work in the previous chapter correctly, the VM should boot immediately. No BSOD, no troubleshooting.
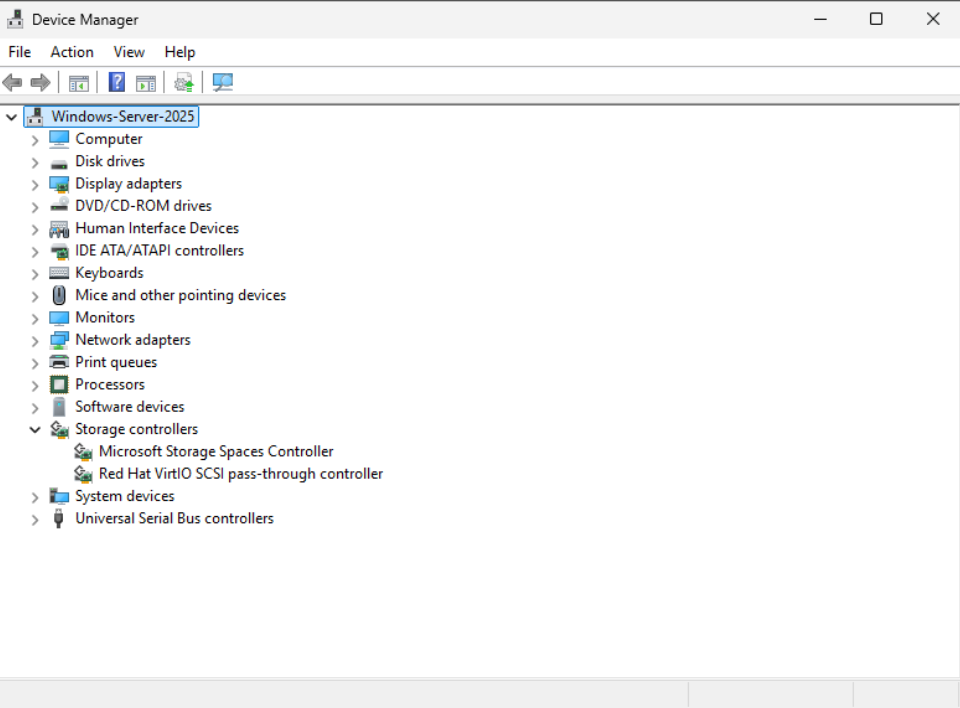
Success: The Red Hat VirtIO SCSI pass-through controller is active and handling the boot disk.
Reality Checks
No matter how you move the bits, don't ignore these three points:
The migration is not live. Forget vMotion or Live Migration here. The VM has to be powered down during the final transfer to keep the data consistent. On fast storage, it might take a few minutes. On slower arrays or large disks, plan for a proper maintenance window.
- Pro Tip for Minimal Downtime: If both hypervisors have access to the same NFS share, you can move the VM disk to that share while it’s still running on ESXi. Then, you shut it down and immediately start it on Proxmox using the same storage. Once it's up, you can move the disk to your final Proxmox storage live. It turns a long data transfer into a quick reboot.
Double-check your hardware settings. In the Proxmox VM settings, make sure the SCSI Controller is set to VirtIO SCSI single. Then, ensure your boot disk is actually attached as a SCSI device (like scsi0). If you accidentally leave it on IDE or SATA, you just did all that prep work for nothing.
Match your firmware. If the original VM was using UEFI, the Proxmox VM must use UEFI. If it was BIOS (Legacy), stay with BIOS. If these don't match, Windows won't even find the bootloader. You'll be staring at an empty shell.
4. VMware Tools Removal
Once you're running on Proxmox, you need to strip out the VMware baggage. There are two ways to do this, and your choice depends on how much you value a clean uninstallation versus an easy rollback.
Way 1: The Clean Break (Before Migration)
You can uninstall VMware Tools while the VM is still sitting on ESXi.
- The plus side: The uninstaller works exactly as intended because it’s still in its native environment. It’s clean and easy.
- The risk: You lose your safety net. If the migration fails and you have to boot back up on VMware, you’re doing it without drivers or at least have to restore the backup made earlier. Also, the second that uninstaller finishes, you might lose your network connection or mouse control. You’ll want to be ready to shut the VM down immediately.
Way 2: The Safe Bet (After Migration)
This is the "no-risk" approach. You leave the source VM completely untouched on VMware and only worry about the cleanup once the VM is safely running on Proxmox.
- The plus side: If things go south during the move, your original VM is still perfect. You just turn it back on.
- The problem: VMware Tools is petty. The second it realizes it isn’t running on a VMware hypervisor, the standard uninstaller will likely error out and refuse to run.
To get around this, you can use a community-developed PowerShell script. It attempts to "trick" the VMware installer by patching it to ignore the hypervisor check. If that fails, it goes nuclear and manually scrubs the drivers, services, and registry entries from the system.
Community Resource Disclaimer: This cleanup script is a third-party tool and isn't maintained by the author of this post. Use it at your own risk. Like anything that touches the registry, review the code and test it on a clone before you run it on your main production database.
5. Summary and Key Takeaways
Successful migration isn't about luck; it's about making sure the guest OS is ready for the hardware switch before it actually happens. If you handle the storage drivers and the cleanup correctly, you move from "hoping it boots" to "knowing it will."
Key Takeaways:
- Drivers must be marked for boot-start: Just having VirtIO drivers in the Windows Driver Store isn't enough. If the driver isn't explicitly configured to initialize at startup, Windows simply won't see the disk.
- Prep on the source system: By running the preparation script while the machine is still on VMware (or physical hardware), you eliminate the need for manual registry hacks or the "SATA-shuffle" hardware loops.
- Expect uninstaller resistance: VMware Tools doesn't like running on Proxmox. Standard uninstallation will fail, so have a cleanup script ready to force the removal of leftover services and drivers.
- Compatibility across the board: This preparation method works regardless of how you move the data—whether you're using the ESXi Importer, a manual P2V, or an OVF import.
Now that the VM is safely on Proxmox, you’ll likely need to fix the network. Windows treats the VirtIO-Net adapter as a completely new device. Your static IP won’t follow it.
Need Help?
Discover how croit can support your Proxmox deployment with expert guidance, automation, and scalable infrastructure solutions.